Feel free to contact.

17 Oct 2019

In this blog post, I will be explaining how to Integrate Wagtail into your existing Django project. Simply showing how to add a blog app in your Django project using wagtail which is a CMS system built on top of Django.
Before diving right in here are other available CMS options to look at and implement the one which suits your requirements best.
The pre-requisites of this process are that you should have a working Django setup on your local system and you want to add a blog application to your project using wagtail which is a great option to add.
I am using an empty Django project as a starting point with project structure as follows
├── db.sqlite3
├── manage.py
├── mysite
│   ├── __init__.py
│   ├── settings.py
│   ├── urls.py
│   └── wsgi.py
├── requirements.txt
└── templates
Next step is to create a blog app using the command
Next, we need to create a requirements file it there do not exists already and add dependencies there and install them
our dependency requirements are:
Django==2.2.6
pytz==2019.3
sqlparse==0.3.0
wagtail==2.3
wagtailcodeblock==1.15.0.0
wagtailmenus==2.8
webencodings==0.5.1
Willow==1.1
django-el-pagination==3.1.0
Markdown==2.6.2
Add these to your requirements.txt file and run the command
pip install -r requirements.txtthis should return success response if there exists some error in the response to this command then there must be some version issue of any package included above.
Next step is to start configuring settings in settings.py file or your base.py file if you have divided your projects settings into different smaller files which is highly recommended to do so.
is settings.py file do these changes
INSTALLED_APPS = [
 ....

 'blog',

 'wagtail.contrib.modeladmin',
 'wagtail.contrib.forms',
 'wagtail.contrib.redirects',
 'wagtail.embeds',
 'wagtail.sites',
 'wagtail.users',
 'wagtail.snippets',
 'wagtail.documents',
 'wagtail.images',
 'wagtail.search',
 'wagtail.admin',
 'wagtail.core',
 "wagtail.contrib.routable_page",
 'wagtailmenus',

 'el_pagination',
 'modelcluster',
 'taggit',
 'wagtailcodeblock',
]
in your middlewares change
MIDDLEWARE = [
 ....

 'wagtail.core.middleware.SiteMiddleware',
 'wagtail.contrib.redirects.middleware.RedirectMiddleware',
]
towards the end of settings.py file add
#Wagtail Configs
WAGTAIL_SITE_NAME = 'Wagtail'
SITE_ID = 1
MEDIA_URL = '/media/'
MEDIA_ROOT = os.path.join(BASE_DIR, "media")
STATIC_ROOT = os.path.join(BASE_DIR, 'staticfiles')
STATICFILES_DIRS = (
    os.path.join(BASE_DIR, 'static'),
)
at this point, we have added the blog app and connected it to Django now next step is to add URLs for this
in mystie/urls.py file add
from django.conf.urls import url
from django.contrib import admin
from django.urls import include
from wagtail.admin import urls as wagtailadmin_urls
from wagtail.core import urls as wagtail_urls
from wagtail.documents import urls as wagtaildocs_urls
from django.conf.urls.static import static
from django.conf import settings

urlpatterns = [
    url(r'^admin/', admin.site.urls),
    url(r'^wagtail-admin/', include(wagtailadmin_urls)),
    url(r'^documents/', include(wagtaildocs_urls)),
    url(r'^blog/', include(wagtail_urls)),
] + static(settings.MEDIA_URL, document_root=settings.MEDIA_ROOT)
for Django >= 2.x.x
replace 'url' with 're_path'
can be imported like
from django.urls import path, re_path
and used like
re_path(r'^blog/', include(wagtail_urls)),
"/wagtail-admin" will be used for managing the backend
"/blog" will be used by the users to view your blogs
and media URLs will serve the images
create a file 'blog/utils.py' and add following code to it
from django.db.models import TextField
from wagtail.admin.edit_handlers import FieldPanel

class MarkdownField(TextField):
    def __init__(self, **kwargs):
        super(MarkdownField, self).__init__(**kwargs)

class MarkdownPanel(FieldPanel):
    def __init__(self, field_name, classname="", widget=None, **kwargs):
        super(MarkdownPanel, self).__init__(
            field_name,
            classname=classname,
            widget=widget,
            **kwargs
        )
        if self.classname:
            self.classname += "markdown"
We are creating these custom markdown field and panel because we will be storing data in it in the form of HTML markdown and will be getting formatted results from it.
to display this markdown in template file we also need templatetags we need to create that as well
create these 2 files
leave the first one empty and add following code to second 'blogapp_tags.py'
from django import template
import markdown
register = template.Library()
@register.filter(name='markdown')
def markdown_filter(value):
    return markdown.markdown(
        value,
        extensions=[
            'toc',
            'extra',
            'codehilite',
        ],
        extension_configs={
            'codehilite': [
                ('css_class', "highlight")
            ]
        },
        output_format='html5'
    )
finally coming to adding models that can leverage the wagtail admin side and help us maintain the blog as a CMS system
we will be creating 2 main models
"BlogPage" which will be the parent of blogposts
and
"PostPage" which will be the actual post page containing your blog post
add following code to 'blog/models.py' file
import datetime

from django import forms
from django.db import models
from django.db.models import Q
from modelcluster.fields import ParentalKey, ParentalManyToManyField
from modelcluster.tags import ClusterTaggableManager
from taggit.models import TaggedItemBase, Tag as TaggitTag
from wagtail.admin.edit_handlers import FieldPanel
from wagtail.contrib.forms.models import AbstractEmailForm, AbstractFormField
from wagtail.contrib.routable_page.models import RoutablePageMixin, route
from wagtail.core.fields import RichTextField
from wagtail.core.models import Page
from wagtail.images.edit_handlers import ImageChooserPanel
from wagtail.snippets.models import register_snippet

from .utils import MarkdownField, MarkdownPanel


class BlogPage(RoutablePageMixin, Page):
    description = models.CharField(max_length=255, blank=True, )

    content_panels = Page.content_panels + [
    FieldPanel('description', classname="full")
     ]

    def get_context(self, request, *args, **kwargs):
        context = super(BlogPage, self).get_context(request, *args,**kwargs)
        context['posts'] = self.posts
        context['blog_page'] = self
        context['search_type'] = getattr(self, 'search_type', "")
        context['search_term'] = getattr(self, 'search_term', "")
        return context

    def get_posts(self):
        return PostPage.objects.descendant_of(self).live().order_by('-date')

    @route(r'^$')
    def post_list(self, request, *args, **kwargs):
        self.posts = self.get_posts()
        return Page.serve(self, request, *args, **kwargs)

    @route(r'^search/$')
    def post_search(self, request, *args, **kwargs):
        search_query = request.GET.get('q', None)
        self.posts = self.get_posts()
        if search_query:
            self.posts = self.posts.filter(
        Q(body__icontains=search_query) | Q(title__icontains=search_query) | Q(excerpt__icontains=search_query))

        self.search_term = search_query
        self.search_type = 'search'
        return Page.serve(self, request, *args, **kwargs)

class PostPage(Page):
    body = RichTextField()
    date = models.DateTimeField(verbose_name="Post date", default=datetime.datetime.today)
    excerpt = MarkdownField(verbose_name='excerpt', blank=True,)
    header_image = models.ForeignKey('wagtailimages.Image',null=True,blank=True,on_delete=models.SET_NULL,related_name='+',)
    categories = ParentalManyToManyField('blog.BlogCategory', blank=True)
    tags = ClusterTaggableManager(through='blog.BlogPageTag', blank=True)
    content_panels = Page.content_panels + [
        ImageChooserPanel('header_image'),
        MarkdownPanel("body"),
        MarkdownPanel("excerpt"),
        FieldPanel('categories', widget=forms.CheckboxSelectMultiple),
        FieldPanel('tags'),
    ]
    settings_panels = Page.settings_panels + [
        FieldPanel('date'),
    ]

    @property
    def blog_page(self):
        return self.get_parent().specific

    def get_context(self, request, *args, **kwargs):
        context = super(PostPage, self).get_context(request, *args, **kwargs)
        context['blog_page'] = self.blog_page
        context['post'] = self
        if request.user:
            if not request.user.is_staff and not request.user.is_superuser:
                self.page_views = self.page_views + 1
                self.save()
        return context


    def get_absolute_url(self):
        return self.url


@register_snippet
class BlogCategory(models.Model):
    name = models.CharField(max_length=255)
    slug = models.SlugField(unique=True, max_length=80)

    panels = [
        FieldPanel('name'),
        FieldPanel('slug'),
    ]

    def __str__(self):
        return self.name

    class Meta:
        verbose_name = "Category"
        verbose_name_plural = "Categories"


class BlogPageTag(TaggedItemBase):
    content_object = ParentalKey('PostPage', related_name='post_tags')


@register_snippet
class Tag(TaggitTag):
    class Meta:
        proxy = True
once we have created the models we need to make migrations and migrate them using commands (NOTE: run these commands from the directory where file manage.py resides)
python manage.py makemigrationsonce all the migrations are done successfully you can create a user if you have not created already.
python manage.py createsuperuserafter this, you should be able to runserver using the command
python manage.py runserverafter the server starts successfully
try to visit the URL
localhost:8000/blog
the URL we added for visiting blogs

you should see something like this we haven't added any templates yet so from where this welcome is coming from for that we need to login to wagtail admin
localhost:8000/wagtail-admin
log in using the username/password created above for superuser
and visit
localhost:8000/wagtail-admin/pages/

here we can see from where this welcome screen is coming from we want to replace them without custom templates for the blog we will be adding next so here are the steps to do that.

Next, we have to set this page as default to show up when we visit '/blog' URL
for that


after this step whenever you visit the '/blog/' URL this blog page whose model we created above should appear
but not right now if you try to visit it, it will display an error because there are no templates added yet to render these blogs lets do that next.
Now we want to add template files
so just create a templates directory inside the blog app
cd blogthis way we will create templates dir inside the blog and another blog directory inside that template directory
blog > templates > blog
inside the last blog directory, create following files
we will be using bootstrap blog theme for this demo here is the link to bootstrap blog theme
<!DOCTYPE html>
<html lang="en">

<head>

    <meta charset="utf-8">
    <meta name="viewport" content="width=device-width, initial-scale=1, shrink-to-fit=no">
    <meta name="description"
          content="{% block meta_description %}{{ blog_page.search_description }}{% endblock meta_description %}">
    <meta name="author" content="">

    <title>{% block title %}{{ blog_page.title }}{% if blog_page.description %} | {{ blog_page.description }}
    {% endif %}{% endblock title %}</title>

 <!-- Bootstrap core CSS -->
 <link href="https://blackrockdigital.github.io/startbootstrap-blog-home/vendor/bootstrap/css/bootstrap.min.css"
          rel="stylesheet">

 <!-- Custom styles for this template -->
 <link href="https://blackrockdigital.github.io/startbootstrap-blog-home/css/blog-home.css" rel="stylesheet">

</head>

<body>

{% block header %}
    {% include 'blog/header.html' %}
{% endblock %}


{% block content %}

{% endblock %}


{% block footer %}
    {% include 'blog/footer.html' %}
{% endblock %}

<!-- Bootstrap core JavaScript -->
<script src="https://blackrockdigital.github.io/startbootstrap-blog-home/vendor/jquery/jquery.min.js"></script>
<script src="https://blackrockdigital.github.io/startbootstrap-blog-home/vendor/bootstrap/js/bootstrap.bundle.min.js"></script>

</body>

</html>
<!-- Navigation -->
<nav class="navbar navbar-expand-lg navbar-dark bg-dark fixed-top">
    <div class="container">
        <a class="navbar-brand" href="#">Start Bootstrap</a>
        <button class="navbar-toggler" type="button" data-toggle="collapse" data-target="#navbarResponsive"
                aria-controls="navbarResponsive" aria-expanded="false" aria-label="Toggle navigation">
            <span class="navbar-toggler-icon"></span>
        </button>
        <div class="collapse navbar-collapse" id="navbarResponsive">
            <ul class="navbar-nav ml-auto">
                <li class="nav-item active">
                    <a class="nav-link" href="#">Home
                        <span class="sr-only">(current)</span>
                    </a>
                </li>
                <li class="nav-item">
                    <a class="nav-link" href="#">About</a>
                </li>
                <li class="nav-item">
                    <a class="nav-link" href="#">Services</a>
                </li>
                <li class="nav-item">
                    <a class="nav-link" href="#">Contact</a>
                </li>
            </ul>
        </div>
    </div>
</nav>
<!-- Footer -->
<footer class="py-5 bg-dark">
<div class="container">
<p class="m-0 text-center text-white">Copyright © Your Website 2019</p>
</div>
<!-- /.container -->
</footer>
{% extends "blog/base.html" %}
{% load wagtailimages_tags wagtailcore_tags blogapp_tags %}
{% block content %}
<!-- Page Content -->
<div class="container">
<div class="row">
<!-- Blog Entries Column -->
<div class="col-md-8">
<h1 class="my-4">Page Heading
<small>Secondary Text</small>
</h1>
{% if search_term %}
<header class="page-header">
<h1 class="page-title">Search Results for <span>{{ search_type }}: {{ search_term }}</span></h1>
</header>
{% endif %}
<!-- Blog Post -->
{% for post in posts %}
<div class="card mb-4">
{% image post.header_image fill-750x300 as header_image %}
<img class="card-img-top" src="{{ header_image.url }}" alt="Card image cap">
<div class="card-body">
<h2 class="card-title">{{ post.title }}</h2>
<p class="card-text">
{% if post.excerpt %}
{{ post.excerpt|markdown|safe }}
{% else %}
{{ post.body|safe|truncatewords_html:50 }}
{% endif %}
</p>
<a href="{{ post.url }}" class="btn btn-primary">Read More →</a>
</div>
<div class="card-footer text-muted">
Posted on {{ post.date| date:"M d Y" }} by
<a>{{ post.owner }}</a>
</div>
</div>
{% endfor %}
<!-- Pagination -->
</div>
<!-- Sidebar Widgets Column -->
<div class="col-md-4">
<!-- Search Widget -->
<div class="card my-4">
<h5 class="card-header">Search</h5>
<div class="card-body">
<form action="/blog/search" method="get">
<div class="input-group">
<input type="text" class="form-control" name="q" placeholder="Search for...">
<span class="input-group-btn">
<button class="btn btn-secondary" type="button">Go!</button>
</span>
</div>
</form>
</div>
</div>
</div>
</div>
<!-- /.row -->
</div>
<!-- /.container -->
{% endblock %}
{% extends "blog/base.html" %}
{% load wagtailimages_tags wagtailcore_tags blogapp_tags%}
{% block content %}
 <!-- Page Content -->
 <div class="container">

        <div class="row">

 <!-- Blog Entries Column -->
 <div class="col-md-8">
                    <div class="card mb-4">
                        {% image post.header_image fill-750x300 as header_image %}
                        <img class="card-img-top" src="{{ header_image.url }}" alt="Card image cap">
                        <div class="card-body">
                            <h2 class="card-title">{{ post.title }}</h2>
                            <p class="card-text">
                                    {{ post.body|safe| richtext}}
                            </p>
                        </div>
                        <div class="card-footer text-muted">
                            Posted on {{ post.date| date:"M d Y" }} by
                            <a>{{ post.owner }}</a>
                        </div>
                    </div>
 <!-- Pagination -->
 </div>

 <!-- Sidebar Widgets Column -->
 <div class="col-md-4">

 <!-- Search Widget -->
 <div class="card my-4">
                    <h5 class="card-header">Search</h5>
                    <div class="card-body">
                        <form action="/blog/search" method="get">
                            <div class="input-group">
                                <input type="text" class="form-control" name="q" placeholder="Search for...">
                                <span class="input-group-btn">
                                <button class="btn btn-secondary" type="submit">Go!</button>
                              </span>
                            </div>
                        </form>
                    </div>
                </div>

            </div>

        </div>
 <!-- /.row -->

 </div>
 <!-- /.container -->
{% endblock %}
Now you should be able to visit
localhost:8000/blog/
and see the templates we added

Now we will test by adding a new "Post" in the blog
for that
To view your post you can just visit localhost:8000/blog/
and your blog post should appear there.
click blog

click Post Page (to add a blog post)

fill in the required fields and finalize the blog

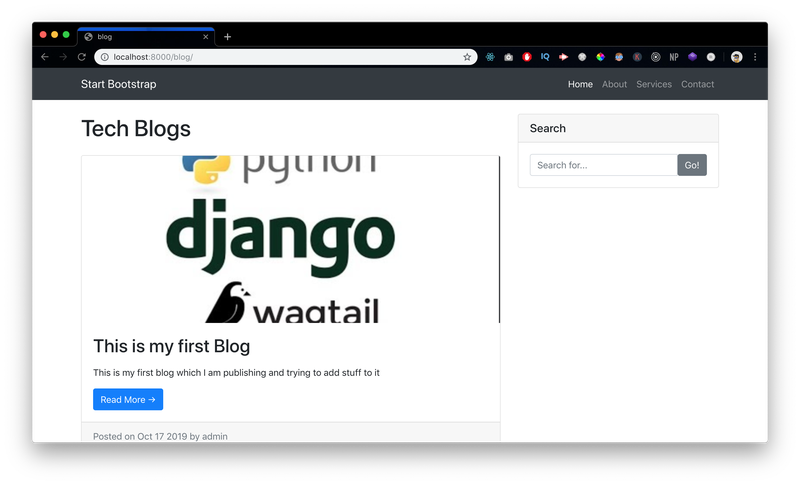
visiting localhost:8000/blog/ will show the just added blog this page is "blog_page.html"

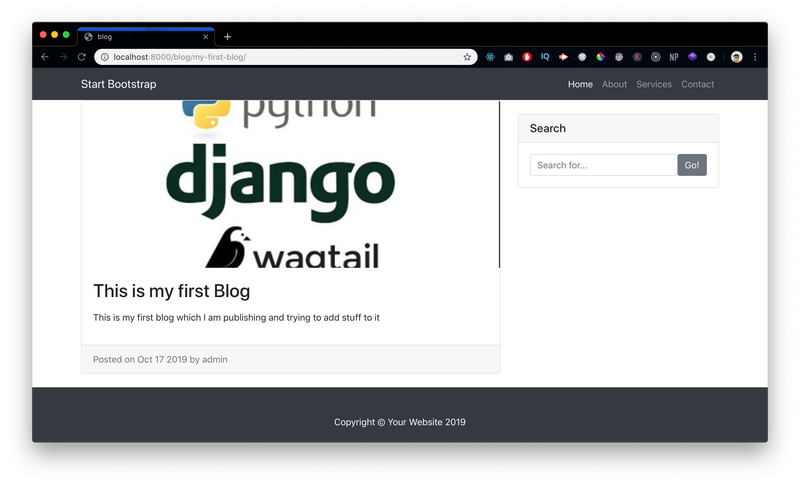
clicking on read more will take to details page i.e "post_page.html"

And finally, that's how we can integrate a wagtail blog system inside an exiting Django project
The search on the right side is also functional. give it a try and see for your self how it is working on the backend. hint* maybe something in the models.py file. Enjoy going through the code yourself. Feel free to ask any question down below if you face any difficulty in following the steps or you are stuck somewhere.
What improvements can be done: